Annke Vision - Front Panel and Rear Panel for Annke NVR
07 May 2026
2 views
Applies to: N48PI/N44PI/N46PI/N44PAM/N48PAW/N46PCK/N88PCH/N441Y/N481Y/NCK800/H800/H500
1. Front Panel

| No. | Name | Description | |
| 1 |
Status Indicator |
Power | The power indicator turns green when the system is running. |
| Status | The status indicator blinks red when data is being read from or written to HDD. | ||
| Tx/Rx | Tx/Rx indicator blinks green when the network connection is functioning properly. | ||
| 2 | USB Interface | Universal Serial Bus (USB) ports for additional devices such as USB mouse and USB Hard Disk Drive (HDD). | |
| 3 | Control Buttons | DIRECTION | In menu mode, the direction buttons are used to navigate between different fields and items and select setting parameters. |
| In playback mode, the Up and Down buttons are used to speed up and slow down record playing, and the Left and Right buttons are used to move the recording 30s forwards or backward. | |||
| In the image setting interface, the up and down button can adjust the level bar of the image parameters. In live view mode, these buttons can be used to switch channels. |
|||
| The Enter button is used to confirm selection in menu mode, or used to check checkbox fields and ON/OFF switch. | |||
| ENTER | In playback mode, it can be used to play or pause the video. | ||
| In single-frame play mode, pressing the Enter button will play the video by a single frame. | |||
| In the auto sequence view mode, the buttons can be used to pause or resume auto sequence. | |||
| 4 | MENU | Press the button will help you return to the main menu (after successful login). | |
| In Playback mode, it is used to show/hide the control interface. | |||
| 5 | ESC | Back to the previous menu. | |
| Press for Arming/disarming the device in Live View mode. | |||
2. Rear Panel
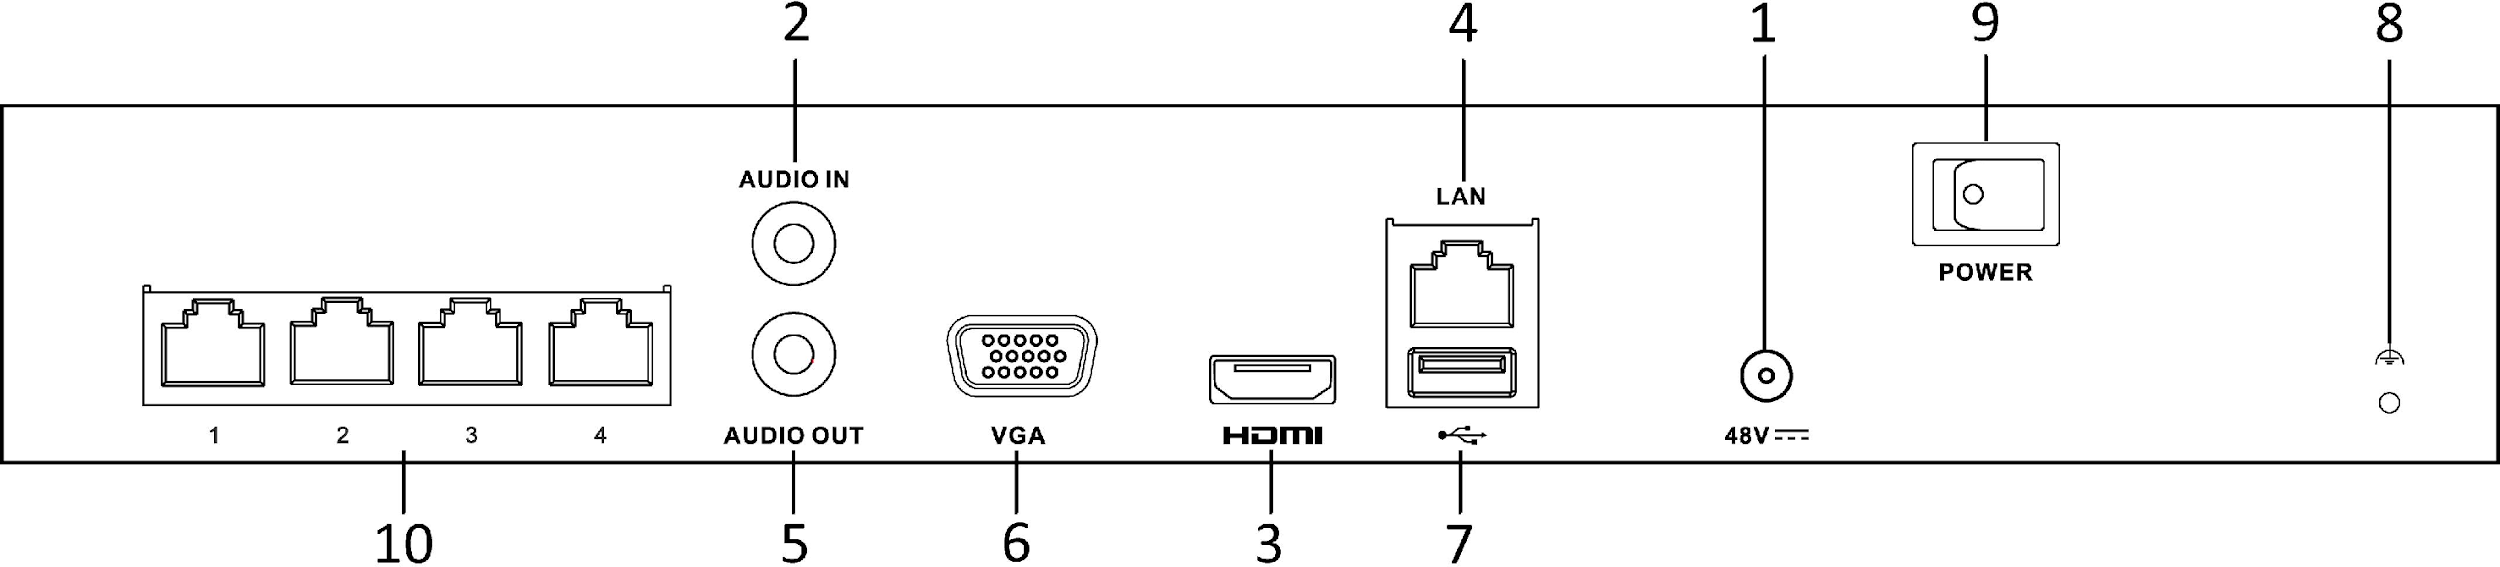

| No. | Item | Description |
|
1 |
Power Supply | 48V DC power supply for N44PI/N44PAM/N48PAW/N46PCK and AC 100~240V for N48PI/N46PI/N88PCH |
| 2 | Audio In | RCA connector for audio input. |
| 3 | HDMI Interface | HDMI video output connector. |
| 4 | LAN Network Interface | 1/ 10 /100 /1000 Mbps self-adaptive Ethernet interface |
| 5 | Audio Out | RCA connector for audio output. |
| 6 | VGA Interface | DB9 connector for VGA output. Display local video output and menu. |
| 7 | USB Interface | Universal Serial Bus (USB) ports for additional devices such as USB mouse and USB Hard Disk Drive (HDD). |
| 8 | Ground | Ground (needs to be connected when NVR starts up). |
| 9 | Power Switch | Ground (needs to be connected when NVR starts up). |
| 10 |
Network Interfaces with PoE function |
Network interfaces for the cameras and to provide power over Ethernet. |
Note: The rear panel varies according to different models.
Was this article helpful?
Bu bilgiler sorununuzu çözmeye yardımcı oldu mu?
Thanks for your feedback!
Still need help?
Uzman ekibimiz size yardımcı olmak için burada.